Showing posts with label garden to table challenge. Show all posts

Sunday, May 27, 2012

Garden to Table Challenge: Venison Fiorentinis

"Girls, I'll be right back, gonna run out to the garden to get some food for dinner."

Oh man, I was starting to feel like I might never have the pleasure of uttering those words again. But alas, the time has finally come - we are starting to harvest little bits here and there, and the satisfaction of providing fresh vegetables for ourselves has returned. :::contented sigh::: Granted it's mostly spinach, and spinach isn't my favorite food, but right now, it tastes lovely!

And this means.... I finally have another post for the Garden to Table Challenge!

I have a deep, heartfelt love for hors d'ouevres and appetizers. I will happily read appetizer recipes in cook books, mark them and add them to my to-make list... and then realize we have no social life and I really have no reason to make fancy hors d'ouevres in real life. And then I decided there was no good reason not to be making them every so often for my family, just because they're good and we like them. Every so often, I'll make a plate of some kind of appetizer and serve it alongside baked potatoes or rice or salad. No one has complained yet, so I'm gonna keep doing it.

Tonight's dinner was just that - Venison Fiorentinis. The original recipe, which I changed quite a bit, came from The Colorado Farmer's Market Cookbook, one I suggest for anyone wanting to cook with fresh fruits and vegetables (and you don't have to be from Colorado to enjoy it.)

Venison Fiorentinis
1 lb venison steaks
4 cups fresh spinach
1/2 C grated parmesan cheese (the real stuff, not the powdery stuff.)
15 sheets phyllo dough
olive oil

Step one: fry the steaks in a bit of olive oil until medium rare. This takes about 8 minutes, turning once. Remove from pan and let cool a bit.

Step two: Chop the spinach into 1/2 inch bits. Toss it into a bowl with the parmesan cheese. Chop the steaks into tiny bits and mix those in as well. Season it with salt, pepper and garlic powder. This is your filling.


Step three: Fold a phyllo sheet in thirds, then cut this rectangle in half. You'll have two squares. Brush them with olive oil, then put a spoonful of filling on each square, fold it in half to make a triangle. Fill a baking sheet with these, then bake them at 400 degrees for 8 minutes or so, til the dough is golden.


No joke, these little things are pretty incredible. They even convince little girls to eat spinach without the slightest complaint. And as far as sinful appetizers go... well, there are more sinful things. If course, they're so little and cute that you don't feel guilty having "just one more"... several times.

If you don't have any venison steaks in your freezer, you could use regular beef steaks and they'd be just as amazing, I'm pretty certain.


I've never purchased or used phyllo dough before (I've lived a sheltered life.) It thrilled me more than it should have. As I was devouring these amazing bits of goodness, I was fantasizing about all the different things a girl could wrap in phyllo dough. The possibilities are endless. Go forth, my friends, and start wrapping things in phyllo. You will not be disappointed. Especially if it involves venison and cheese.

Monday, April 23, 2012

Garden to Table Challenge: Asparagus

It's Garden to Table Challenge day again! Wow, where did that week go? I wish I could tell you that I've got some great harvest to write about, but all I've got to show for my gardening efforts so far are some spinach seedlings and inch-high peas and onions. With the warm days we've been having, I am holding out hope that some day... perhaps in the distant future... I will produce some food from this new ground I'm working.

In the meantime, I'm still doing my best to make good use of what Mother Nature has to offer. This week: wild asparagus. Picking wild asparagus is an annual tradition around here, and with the warmer days a bit earlier this season, asparagus is already popping up along fence lines.

I've got a fridge full of asparagus spears standing in jars of water, waiting for canning tomorrow. Tonight's dinner was what I'm writing about today though - fish fillets poached in a wine/garlic/butter sauce with roasted parmesan wild asparagus spears alongside.

If I was cooler - and had planned ahead better, I'd have taken a picture. You'll have to use your imagination, but I promise, it was a beautiful meal.

For the asparagus:

Trim 1 lb (ish) asparagus spears. Place them in a shallow baking dish. Toss with a bit of olive oil to coat, sprinkle with salt and pepper. Then sprinkle on about 1/4c. parmesan*. Or a third of a cup... or a half of a cup. I love parmesan. Cover the dish with foil, bake at 400 degrees for about half an hour. Seriously, it's that easy, and it's so good.

*Don't use that grated powdery stuff that comes in the spaghetti aisle. Buy real, grated parmesan. (Or grate some yourself.) It's worth it. I promise.

And in case you're dying for a new, super fast and easy fish recipe:

Tilapia with Wine/Garlic sauce:

Place 6 partially thawed tilapia filets in a shallow baking dish. Put a thin pat of butter on each filet. Drizzle white wine over it all, then squeeze half a lemon over that. Sprinkle with sea salt, dehydrated garlic and dried parsley. Cover with foil, bake about 25 minutes, til it flakes.

So it takes a total of about ten minutes to have this all in the oven. Then you can walk away and feed the baby chickens and turkeys, hoe a row in the garden, and come in just in time to put it on the table with a loaf of bread. Easy peasy.

So there's my Garden to Table Challenge submission for the week. Again, sorry for the lack of pictures. A hungry family sitting down to the dinner table doesn't look kindly upon Mom insisting they all stop eating so she can photograph their plates. I decided to let them eat in peace.

Tuesday, April 17, 2012

Garden To Table Challenge: Dandy Bread

It's Garden To Table Challenge time again!

Alas, I now live in the mountains, where even if you have the nerve to get out and plant seeds before June, the weather isn't warm enough to make them sprout. And so... I got nothin'. At least as far as gardening goes. I have a sneaking suspicion I have no idea just how hard it will be to garden in this new climate.

However, I refuse to let our lack of homegrown spring veggies stand in the way of Wendy's fun blog challenge. While gardens up at our elevation might not be producing much, the weeds don't seem to mind the lack of warmth. We have a lawn full of dandelions right now (much to my husband's chagrin) and where there's a homesteading will, there's a way.

I happened to mention to my Littlest One that dandelions are, in fact, actually food. This prompted her to go outside, grab one, and eat it. Um, yeah. Not the best tasting thing she's had lately. I told her I'd read about making things like dandelion bread and dandelion muffins, and even dandelion wine.

"Oh! If I make dandelion wine, can I drink some?"

We opted for bread.

But first came the pleasure of 'harvesting' the dandelions.


Because picking dandelions is about the most fun you can have when you're four years old.


Eventually she enlisted the help of The Oldest.


It didn't take long before they had a basketful of dandelion blossoms.


Of course, it took twice that long to separate the petals from the sepals to actually use them in baking, but we managed.

And so, we baked our dandelion bread. The result? It really doesn't take much different from any other quick bread, but at least it's got pretty yellow specks in it. And when you're four, the novelty of eating flowers is worth all the effort.

This post is shared at Greenish Thumb's Garden To Table Challenge. Head on over to join in the fun!

Sunday, July 24, 2011

Garden to Table Challenge - Spicy Veggies & Noodles


Again with the raving about The Food Matters Cookbook - I don't think we've yet tried a recipe from it that wasn't great. And I love that I own a cookbook that includes recipes for everything I have coming out of the garden at any given time - currently spring onions, garlic, carrots, squash, green beans, and hot peppers. The veggies are stir fried, then tossed with brown rice noodles and a sauce made of coconut milk, peanut butter, honey and soy sauce. Seriously good, and I don't even like squash.

The best part of this book is the options he gives for substituting. If you don't have peanut butter, try almond butter, cashew butter or tahini. If you don't have zucchini and eggplant (as the original recipe called for) try any summer squash, green beans, etc. You never end up hunting for some strange ingredient at the store - most recipes can be created by the things any healthy eater already has in her pantry and fridge. Creative recipes using 'normal' foods. I like that.

===

For dessert: remember the strawberry lemonade from last summer? It also makes really good popsicles.


Friday, July 22, 2011

Garden to Table Challenge - Tomatoes


Tomatoes are finally here! Well, not mine... my darn heirlooms are so slow this year it's almost painful. Lots of green ones, but none ripe yet except for a small handful of cherry tomatoes that never even made it into the house. So I bought a couple at farmer's market, and they were delicious.

Sometimes the most simple food is the best tasting. After a long, busy day, there wasn't time for a big, complicated dinner, but that was just fine: fresh summer tomatoes really don't need big and complicated. They just need a little basil.

The Summer Sandwich:

1 loaf of asiago and sundried tomato sourdough bread
garlic cloves
fresh basil leaves
slicing tomatoes
grated mozzarella
butter

Split open the garlic cloves, crush them slightly to release their juice, and rub them on one side of each slice of bread, then spread butter on one side of the bread.

Put the bread butter-side down in a large skillet and top with mozzarella cheese. Cover the skillet, then cook on medium until the cheese is melted and the bread is starting to toast.

Layer a couple of basil leaves (I used one green leaf and one purple leaf for each small sandwich) and a tomato slice on each piece of bread, top with more buttered bread, flip, and cook just until the bread is toasted on that side too. This method gets the cheese melted and the bread toasted, but keeps the tomato and basil from cooking too much.

And there you have it. The easiest summer sandwich in the world. So simple, so satisfying.

Sunday, June 12, 2011

Garden to Table Challenge- Rhubarb Pie

It's no secret that I am a Pie Making Failure. There are a lot of domestic, housewife-y things I do a good job of, but making pies has never made it on that list.

But lo! What's this?


I've made a pie! A pretty one. And even better than being pretty... it tastes good, too.

I bought some rhubarb at the Farmer's Market, since it was about the only thing I could find that I hadn't already grown myself. I've only ever purchased rhubarb one other time, and the resulting cobbler wasn't all that good. But I gave it another go, and I'm glad I did.

I also (gasp) turned my back on the pie crust recipe my mother gave me, the same recipe every woman in my family uses to make incredible pies. It felt a bit like sacrilege, but I had to do it - mine just never turn out like hers do. This time I followed the recipe from my red and white checkered cookbook. The only change I made was using whole wheat flour. Which was probably pointless, considering the other main ingredient is Crisco. Pretty sure Crisco negates any health benefits of whole wheat flour. But whatever. It was really good.

The recipe:

Strawberry Rhubarb Pie

Filling:
2 cups chopped rhubarb
2 cups sliced strawberries
1/4 cup whole wheat flour
3/4 cup raw cane sugar

Mix it all together until the fruit is well coated. Set aside.

Crumb topping:
1/2 cup whole wheat flour
1/2 cup brown sugar
3 Tbsp. butter

Cut together with a pastry blender until crumbly.

I'll let you find your own pie crust recipe... mostly because I can't remember exactly how much of everything I used, and also because pie crust recipes are easy to come by.

Press the crust into a pie plate. Dump in the fruit. Sprinkle with the topping. Cover the edges of the pie with foil, bake for 30 minutes. Take off the foil, bake for another 30 minutes. And there's your pie.


Friday, June 10, 2011

Garden to Table Challenge

I've totally fallen off the bandwagon with Wendy's Garden to Table Challenge. My excuse is that I seem to have forgotten how to cook Summer Food. We're still eating soup four times a week, because it's all I can seem to remember how to make. Well, and salad, because we've got a Lettuce Problem again in the garden. (I really need to learn to plant in succession. But that requires more planning and patience than I usually possess.)

So anyway, I'm sharing a soup recipe with you. Because soup is still good, even when it's 90 degrees outside. Just turn on the air conditioner before you get started, or everyone in the house will be sweltering before it's even time to come to the table.

It's garlic scape season. If you haven't had garlic scapes, try them. I saw some at Farmer's Market last night, so they're available even if you didn't plant garlic last fall. They remind me of garlic chives, only bigger and bolder. Like green onions, but with a distinct garlicky flavor. We tried them chopped raw in a salad last week, and learned that they are probably better cooked. But do give them a go, they are a delicacy!

Potato Scape soup

1 quart chicken stock (plus extra for thinning)
5 or 6 potatoes of a creamy variety (try Yukon Gold) peeled and roughly chopped
6-8 garlic scapes, diced
1/2 medium onion, diced
1/4 cup butter
salt and pepper
If I'd had white wine on hand, I would've added half a cup. But I didn't, and it was still good.

Melt the butter in a big soup pot. Saute the onions and scapes until tender but not browned. Add the potatoes and stock. Boil, then reduce heat and simmer until potatoes are very soft. Use a stick blender to whir the soup, leaving some chunks but making it fairly smooth and creamy. Salt and pepper as desired. Serve with slices of fresh, buttered bread. It's a good dipping soup. This soup will thicken the longer it sits, so eat it right away, or be prepared to thin it down with more chicken stock.

Next week, I'll shoot for something a little less... um, warm. Like strawberry-rhubarb pie, because I bought rhubarb on a whim last night at Farmer's Market and now need to figure out what on earth to do with it.

Happy Local Eating, everyone!


Monday, May 16, 2011

Garden to Table Challenge - Week 3

This week's recipe comes (again) from the Food Matters Cookbook. I'm starting to feel a little Julie & Julia-esque, except that I'm serving Mark Bittman recipes every night instead of Julia Child. I suppose I could rename these posts "Julie & Mark"... except that reminds me too much of my ex-husband, and that creeps me out.

So we'll stick with The Garden to Table Challenge.

In keeping with the Bacon Makes Everything Taste Better theme, I present to you:


Asparagus Gratin.

It's wild asparagus season again. We're lucky in that we can spend twenty minutes driving down a country road and come home with enough asparagus for two meals. Tonight's original meal plan was grilled snow-goose breast with wild rice and steamed asparagus, but after an afternoon spent thinning carrots and weeding in the hot sun, and Daddy not being home for dinner, I decided to go for something lighter and simpler.

Asparagus Gratin (I'm not copying this word for word because the book is in the other room and I'm lazy.)

1 1/2 lbs asparagus (I did about half a pound for the girls and I.)
3 Tbsp. olive oil
salt & pepper
2 slices bacon, chopped
1 Tbsp. minced garlic (I used fresh. Well, garlic from last year's garden, which isn't actually fresh, I suppose, but seems to be holding on pretty well after being stored for nearly a year.)
3/4 c homemade breadcrumbs

Roast the asparagus in a couple tablespoons of the olive oil and some salt and pepper. The book says 400 degrees, but I had potatoes in the oven at 350, so that's what I did and it worked. While the asparagus is roasting, cook the bacon in the last tablespoon of olive oil til crisp. Then add in the garlic and breadcrumbs and cook and stir until golden.
When the asparagus is tender, sprinkle the topping on it, then broil it for a couple of minutes until the topping is nice and toasted.

I served this with Parmesan Potato Rostis.


I'm not going to give you that recipe because it has absolutely nothing to do with local, seasonal food, and honestly I'm feeling a little bit funny sharing so many of Bittman's amazing recipes here on my blog. Once again, check out his book. I realize that rostis and asparagus gratin probably don't go together. But I promised The Oldest that I'd make rostis again sometime this week because they are her New Favorite Food.

And for dessert:


Homemade vanilla pudding with fresh fruit. In addition to it being strawberry season, raw milk is also in abundance at our house. Pudding uses it up nicely, and is a little more of a treat than plain yogurt. I had no idea how easy it really is to make pudding from scratch until I gave it a go. Try it. You'll give up Snak-Paks for good, I promise.

I used this recipe I found on allrecipes.com and was really happy with it. It doesn't involve egg yolks, which was a plus.

What are you cooking this week? If it's from your garden, or is local and seasonal, Wendy wants to hear about it at the Garden to Table challenge. Come join in the fun!


Thursday, May 12, 2011

Garden to Table Challenge - week 2


Totally missed week 1 of the Garden to Table Challenge - just so much going on this spring that I never found the time.

In the garden:


Greens. Lots of greens. Turnip greens, spinach, kale, lettuce and mesclun. The story of spring, I suppose.

We all know greens are really great for us. And if we're all being honest, we'll admit that steamed greens are... well.... not really all that good.

So instead of sharing healthy recipes for greens this week, I'll just share some tasty ones.

There are two things that compliment greens beautifully: pork and hominy.

Unless you don't like hominy. But we do. And taking a page from Southern cooking - bacon makes just about everything taste better.

Recipe #1: Lewis and Clark's bacon and hominy (altered from Cooking on the Lewis and Clark Expedition by Mary Gunderson. Because we're homeschoolers, and we love books like that.)

1/2 package of bacon
2 cans of hominy
A big ol' handful of chopped greens. (Whatever's the most prolific in the garden is fine.)
Pepper

Chop the bacon into bite sized pieces. Fry it up in a pot on the stove. When it's mostly crisp, add the hominy and greens and pepper to taste. Simmer until the greens are wilted and the hominy is warm.

This makes a nice side dish. The kids also love it for breakfast topped with a scrambled egg and some cheese.

Recipe #2 comes from Mark Bittman's The Food Matters Cookbook, my current obsession. You should all go buy it. Seriously, it's that good. Nearly everything we've made so far has been fantastic, and it uses natural, Real Food ingredients, and not too many 'weird' ingredients you have to go out of your way to find.

I changed up just a few little things. I'll give you my version. If you want Mark's, check out his book.

Posole (Mexican pork and hominy stew)
2 pork chops
1/2 onion, chopped
A few cloves of garlic, minced
1 Tbsp. chili powder
A big pile of any sturdy greens - I used a mix of kohlrabi, turnip and spinach - chopped
2 cans hominy, with liquid
1 can black beans (or 1 1/2 cups cooked blackbeans, if you aren't into using canned.)

Brown the pork chops in some olive oil at the bottom of a soup pot. Remove them, and cook the onions and garlic until soft. Add the chili powder, cook, and stir for another minute or so. Put the pork chops back in the pot along with the hominy, beans, and greens. Add water to cover the ingredients, bring to a boil, then reduce to a simmer and cover. Stir it occasionally, add more water if needed, until the pork chops are tender - about 10 minutes. Pull the pork chops out, chop them up, and return them to the pot. I served this with warmed corn tortillas, and it was really good.

What are you harvesting this spring? Be sure to share your seasonal recipes at Greenish Thumb and join in the fun (and the contest!)


Sunday, November 7, 2010

I roasted a goose!

Two goose posts in two days...

There have been two whole snow geese in my freezer since March. For eight months, I've feared preparing a Roast Goose. Have you ever read up on how to roast a goose? Virtually every article and recipe start out the same: "Roast goose has a bad reputation. It can be greasy, fatty, and livery, unless you know how to do it right."

That's not encouraging. I've never roasted a goose - I sure as heck don't know how to do it 'right'.

I checked in the Little House Cookbook. It involved seventeen hours of cooking on a wood stove with the draught open. I have a good supply of kitchen appliances, but a woodstove with a draught is one thing that's missing.

My Better Homes and Garden cookbook - the standby for everything I could ever want to cook - doesn't actually have even one goose recipe.

After scouring the internet, and finding several different articles and suggestions, I settled on this one from Hank Shaw of the blog Hunter, Angler, Gardener, Cook. Based on what I had on hand, and what I read in a few other blogs, I made a few changes: I stuffed the inside of the bird with apples and onions, and I let it roast til the breast was about 142 degrees.

One thing 'they' talk about with geese is the huge amount of fat in them. Apparently this isn't so much an issue with wild snow geese... at least, it wasn't with this one. Hardly a bit of fat on the silly bird, just barely enough to baste it with every 20 minutes or so. Because of this, I covered the whole roasting pan with foil, hoping to get some actual drippings. Not so much a success, but at least it wasn't dry.

So anyway, the verdict: roast goose is really good. It's tender, juicy, and has a mild but definitely distinct flavor. And it really wasn't that hard. Other than pricking the skin to allow the fat to drain (which was probably unnecessary with this particularly fat-less bird) it wasn't any different than roasting a chicken. I served it with basmati rice and home grown roasted beets. The carcass is in the crock pot now, hopefully turning into goose broth for soup this week.

I'm glad I finally sucked it up and tried it - it wasn't nearly as bad as I was expecting. I'm pretty sure it won't take me another 8 months to roast the next one.

Saturday, October 30, 2010

Garden to Table Challenge - Week Eleven

Hey, look at that - I'm actually posting when I'm supposed to be!

This is the last week to enter the Garden to Table Challenge. Prizes will be drawn this week, so if you'd like to enter, this is the week to do it! Just share what you've been cooking, from your garden or locally purchased fruits and veggies, and link up with Wendy at Greenish Thumb.

This week's 'recipe' is a simple, high-energy, tasty, and mostly homemade snack. It's not really a recipe, and it's completely alterable, but here's what we had on hand this morning.

Spiced pumpkin seeds, sunflower seeds, dried apples, and dried apricots.


To make spiced pumpkin seeds (you have GOT to try these):

Wash and dry your pumpkin seeds. I scrub them over a colander, then spread them on a stoneware cookie sheet overnight to dry.

Mix up your tasty goodness: about four tablespoons of melted butter, a dash of salt, then cinnamon, nutmeg and cloves to your taste. (Or you could use allspice. Or you could use apple pie spice. Or you could use anything else that sounds good.) I added a pinch of stevia. If you're not on a no-sugar diet, you could add some sugar instead. Mix all that in a bowl to make a "sauce".

Put your dry pumpkin seeds in a plastic bag. (Or a bowl.) Pour the "sauce" over them, seal the bag, and let your small ones squish the bag to their heart's content. (Or stir in the sauce, if you're using a bowl.) Make sure the seeds are well covered, then spread onto a baking sheet.

Bake at 275* til golden, stirring about every five minutes. Mine took almost half an hour.

Then, unless you had no plans for them, hide them from your children, who will happily burn their tongues on the hot seeds in order to eat them as quickly as you'll allow.

===


To the spiced pumpkin seeds, I added some dried apples (from a local farm), dried apricots (from a neighbor's tree) and sunflower seeds (some from our yard, some from the store.) Then I raided the cupboards to see what else would be good with them, and found some raisins, almonds, cashews, walnuts and dates.

I make up little baggies of mixes like this anytime we're going to be out and about during the day. Inevitably, children end up starving dramatically as soon as we walk into a store. This seems to fend that off, and I can snack along with them and not feel too guilty about it.

And now, we'll take our snack mix along as we go parade on Main Street with the other kids in costumes, in hopes that my children will fill up on this wholesomeness before they have sacks full of candy to devour.


Wednesday, October 27, 2010

Garden to Table Challenge - Week Nine

Ahh, the end of garden season.

We had our first frost the other night, effectively murdering the tomatoes, peppers, and beans. Can fresh tomato season really be over already? It feels like it only just begun...

Oh right. It did just begin. Because we've had the strangest weather ever here in the High Desert. Our average first frost is September 16th. This year, we were barely harvesting tomatoes by then! Thankfully the weather held out another month, so at least we did get to enjoy the best of summer's garden produce.

But now, it's come to an end. I made our last batch of fresh-from-the-garden tomato soup for dinner the other night.

The last of the peppers made the last meal of stuffed bell peppers tonight.

We had garden-fresh stir fry for the last time the night before that - fresh broccoli, carrots, green beans, leeks and chard. Stir-fry makes frequent appearances on our table all through summer - at least once or twice a week, beginning in April or May. I'll be sad to see it go, though I have a feeling the children are rejoicing.

It's time now to start serving soup, stew, and chili, time to start breaking into the Winter Stores from the basement.

And it's time to start flipping through seed catalogs and sketching garden plans on graph paper.

Goodnight, sweet garden. I've enjoyed you tremendously. Have a nice rest, and we'll see you next spring.

Sunday, October 17, 2010

Garden to Table Challenge - Week Nine

I failed kind of miserably this week on this challenge. Cut me some slack, though - we were on a trip out of town for half of the week and I wasn't doing much cooking. So instead of talking about cooking, I'll talk about canning.

The bulk of this year's garden is just about finished. We're expecting our first frost in another week or so. The beans are yellowing and drying out...


I stopped watering the tomatoes so they'd start turning...


The pretty little garden from early summer is gone, replaced by a well-used, slightly neglected plot of land that's working hard to produce enough vegetables to feed our little family.

The peppers will be picked this week and put into the freezer. The last of the beets will be pickled. Only the broccoli, leeks, and greens will be left to do their best to survive. The cold frame is full of baby kale, lettuce, and greens for winter, and I'm starting to make plans for next year. I still can't believe an entire gardening season is already over! Where did the time go?

But just because it's starting to cool off doesn't mean we won't be enjoying garden veggies. The girls and I have been hard at work saving everything we haven't managed to eat fresh. The shelving unit my sweet husband built for me in the basement is piled high with yummy things that we'll be enjoying in the frozen winter months.


The bottom shelf is where I've stacked the tubs of beets and carrots packed in sand (which seems to be working out well, so far.) There will still be another half-dozen jars of pickles, some pickled beets, and probably more canned tomatoes, along with (hopefully) a couple bushels of local apples.

Here's the running total on canned goods so far:

Strawberry jam: 15 pints
Pickled asparagus: 6 pints
Apricots in syrup: 29 pints
Apricot jam: 5 pints
Tomato salsa: 16 pints
Peach salsa: 8 pints
Peaches in syrup: 10 quarts
Bread & butter pickles: 16 pints
Dill pickles: 8 pints
Whole tomatoes: 12 quarts

Many of the ingredients were grown in our own garden. Most of the rest were purchased from local farmers or gifted to us from neighbors. Maybe next week we'll talk about what's in the freezer... :-)

Are you still harvesting or eating local, fresh produce? Be sure to check in with Wendy at Greenish Thumb to share your successes and read about others' at the weekly Garden to Table challenge!

Tuesday, October 12, 2010

Garden to Table Challenge - Week Eight


The broccoli in my garden is doing a funny thing. It's making broccoli again.

Broccoli loves cool weather. Here in the High Desert, we have a shortage of cool weather for most of our growing season. I figured my broccoli was done as soon as our highs reached 100 degrees, but apparently it was just taking a break. It produced it's big heads early on in the spring, took a nap in the heat of the summer, and is now sprouting little teeny heads. I'm getting enough to add broccoli to our dinners once or twice a week - nothing exceptional, but still, it's fresh broccoli! This is the first year that I've actually grown broccoli plants that produce heads. I'm not sure why, but it's been a difficult plant for me in years past, so I'm happy with anything I can get at this point.

I made this dish the other night - baked tilapia with vegetables. There's nothing exciting about it except for the fact that this is the first time I ever made fish. I've never been a fish eater. I didn't like it once, assumed I'd never like it, and never bothered with trying to cook it. But it was really good! So good, in fact, that I've made it again since these photos were taken last week.

The recipe was simple: lay tilapia filets in a buttered baking dish. Dot with butter, sprinkle with seasoning. (I used citrus herb Mrs. Dash.) The original recipe I found (on allrecipes.com) called for a bag of frozen mixed vegetables, but I substituted what I had on hand from the garden - some broccoli, carrots, and zucchini. The veggies are spread in the baking dish around the fish, covered with foil, and baked for about 20 minutes at 350. I served the fish and veggies alongside some steamed chard, and it was a pretty fantastic dinner.

===

The garden is definitely slowing down. We should have our first frost in the next couple of weeks. To walk through the garden is sort of depressing, seeing as it looks like a very used garden now. Gone are the pretty, neat little rows of root crops, the lush bean vines and enormous sunflowers. All that's left are the tomatoes and peppers, broccoli and kale, a few other miscellaneous bits, and lots of weeds. Soon I'll be pulling everything out, tilling, and planting the fall garlic and nurturing the greens in the cold frame. How did this summer fly by so fast?

Saturday, October 2, 2010

Garden to Table Challenge - Week Seven

I've been cursing myself all summer for growing so many varieties of heirloom tomatoes, and not enough reliable hybrids.

Heirlooms are wonderful - the taste can't be beat, and they look so cool in all their funky shapes and colors. But they just don't produce like hybrids do. Hybrids are guaranteed to give you a good solid harvest, if not quite as great tasting tomatoes.

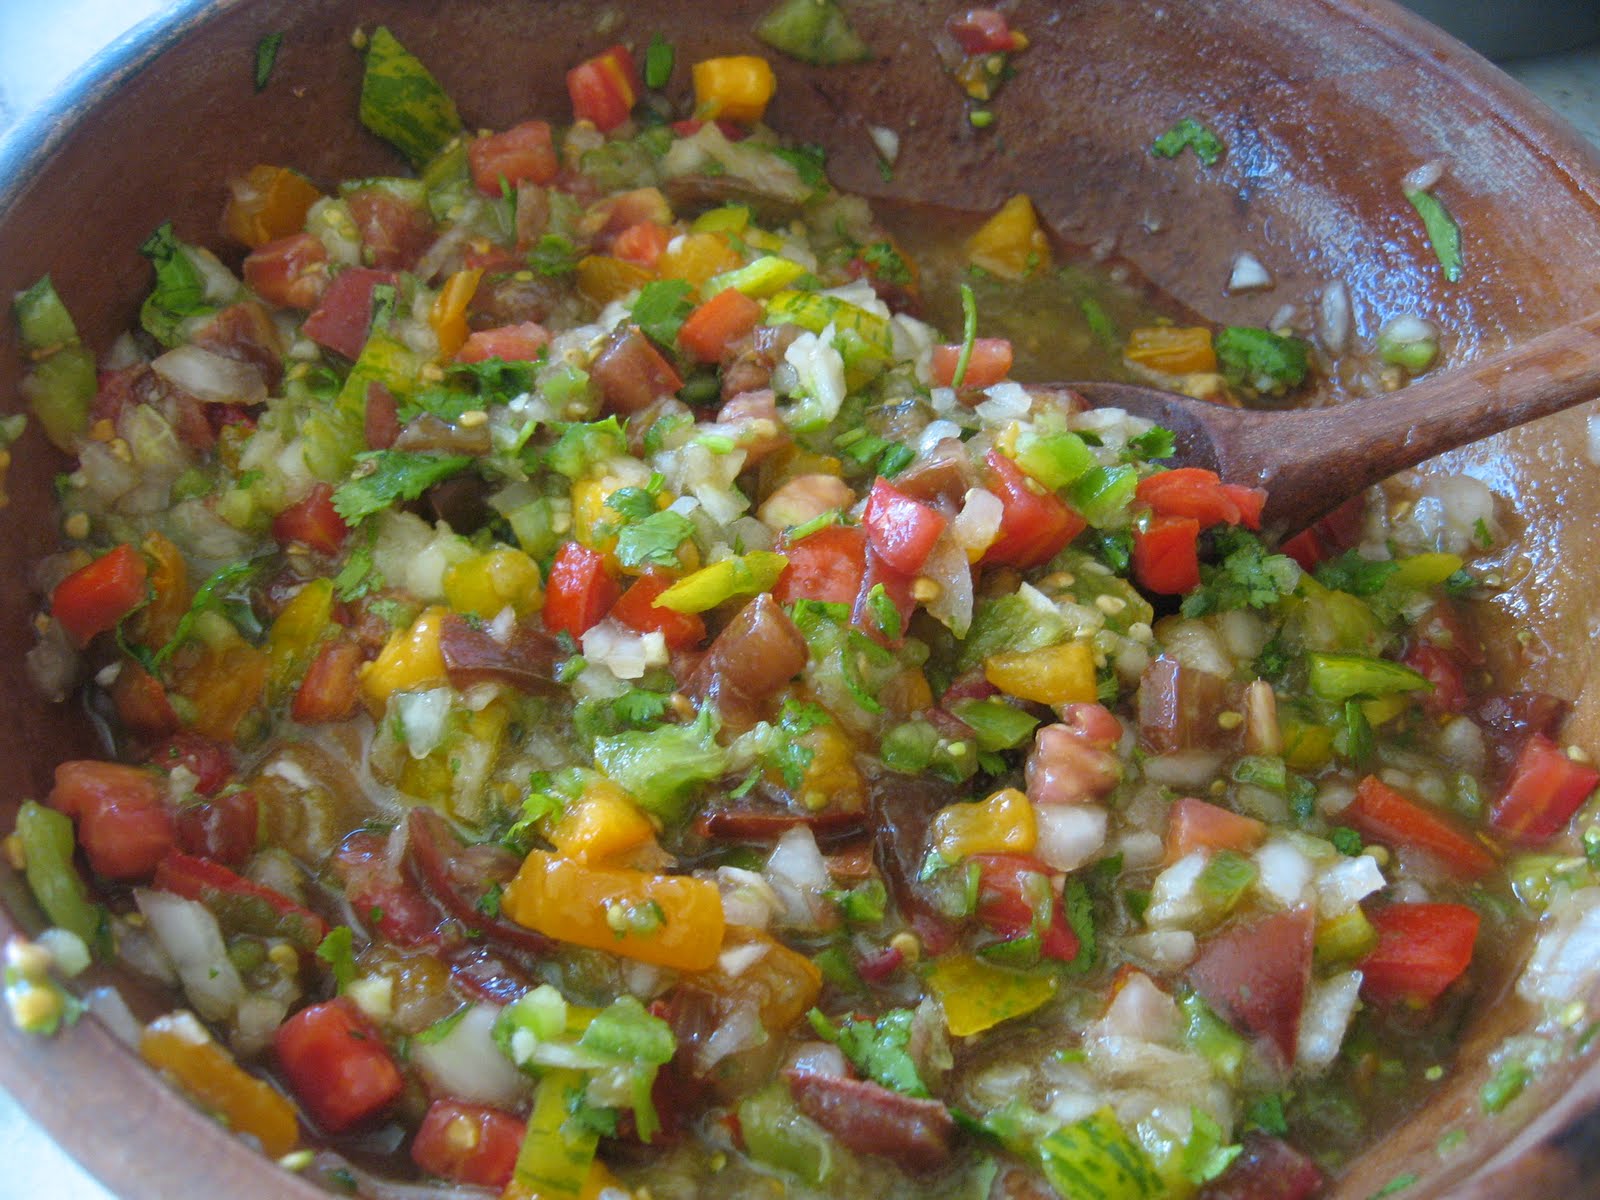
I did find one fantastic use for some of my heirlooms this week though - I made the prettiest salsa I've ever seen.


Red - Early Girl and Polish Linguisa
Purple - Black Krim
Yellow - Green Zebra
Orange - no idea, some guy on the street gave it to my husband.

All chopped up and mixed together, they looked like a rainbow.


I added the usual salsa ingredients - an onion, some sweet red and green peppers, lots of garlic, cilantro, etc. Nothing too special, perfect for tacos and for scooping onto tortilla chips. Between the heirloom flavor and the gorgeous colors, I think this might be the best pico de gallo I've made in a long time. Yum!


Don't forget to check out Greenish Thumb this week to hear more about using garden produce in the kitchen, and add your own ideas and recipes.


Sunday, September 26, 2010

Garden to Table Challenge - Week Six

Just a quick post to keep up with Wendy's Garden to Table challenge.

Camping for a week limits my garden-based meals, but I did come up with this one on an evening when I was starving and sick of Amy's Kitchen organic canned soups.


Sliced garden zucchini (from my mother's garden) sauteed (on a propane camp stove) in a simple salad dressing (olive oil, cider vinegar, a touch of brown mustard and some herbs), then tossed with diced cooked chicken breast and coarsely chopped garden tomatoes and heated through. Quick, yummy, and satisfying, especially when eaten outside on a cool night in the mountains.

If you're a gardener - or enjoy the fruits of someone else's garden - be sure to share your tasty meal ideas and recipes on Greenish Thumb's weekly challenge!


Saturday, September 11, 2010

Garden to Table Challenge - Week Four

Have you ever scrubbed carrots? Not store-bought carrots, but ones pulled right out of the ground? Man, carrots are filthy vegetables. I only had to wash about ten pounds of them, but my hands are raw and sort of orange-tinted, my back aches from standing at the sink for so long, and well... ugh. Harvesting carrots = great fun. Washing carrots = not much fun at all.

Since I'm currently standing knee deep in carrots, my Garden to Table Challenge recipe this week is - you guessed it - a carrot recipe. This one is great as a side dish to an Asian entree, or just piled on top of basmati rice for a simple lunch.


Sesame-Ginger Carrots
1 lb carrots (fresh or frozen) sliced into coins
3 Tbsp. dried minced onion
2Tbsp. sesame seeds
1/2 tsp. sea salt
1/2 tsp. ground ginger
1/8 tsp. pepper
4 Tbsp. butter
2 tsp. molasses

Saute the carrots, onion, sesame seeds, salt, ginger and pepper in butter for 4-5 minutes or until tender. Stir in molasses and serve.

Be sure to stop by Greenish Thumb for more links to this week's Garden to Table Challenge recipes!


Saturday, September 4, 2010

Garden to Table Challenge - Week Three

I've started a new "diet" or sorts - just temporarily, to try to clear up a few health issues. Anyway, it's a diet that includes not eating any dairy, wheat or refined carbs, or sugar. It's not the most fun I've ever had on a diet, I promise.

But, it's forced me to be creative in trying to concoct meals I actually want to eat, while also using up goods from the garden and working in the last of the elk in the freezer.

My recipe this week includes leeks, carrots, parsley, and kale from the garden, as well as some homemade elk breakfast sausage. This is the first year I've grown leeks, and the first year I've ever cooked with them, so I'm adding them to just about everything I possibly can. Because I planted seventy of them, not really thinking about the fact that I didn't even know how to use them.

Sausage Barley Soup

1 lb bulk sausage (if you don't happen to have elk sausage on hand, any will do. I can see this being pretty tasty with some Italian sausage too.)
4 cups beef stock
2 medium-sized leeks, sliced thin, greens discarded
2/3 cup coarsely grated carrots
2 Tbsp. fresh parsley, chopped
1 cup chopped kale
1/2 cup rolled barley

Cook the sausage till brown throughout. Add leeks and carrots, cook 2-3 minutes till softened a bit. Add stock, parsley, and barley. Simmer 15 minutes, then add the chopped kale. Continue cooking another 10-15 minutes, until barley is soft.

Love soups that are super easy and fast like this. And it's really, really good reheated.

Be sure to check out Greenish Thumb for more links to great garden-to-table recipes!

Saturday, August 28, 2010

Garden to Table Challenge - Week Two

It's been a weird summer. No one's tomatoes are ripening yet, and I've only had a few compared to what I'm normally harvesting by this time of year.

But my Early Girls are finally starting to ripen, and I used a couple of them today in the recipe for Raw Spaghetti Sauce I'm posting for this week's Garden to Table Challenge post, along with some garlic and basil from the garden and a few other simple ingredients.

My sister in law made this sauce last week, and I had the pleasure of sampling it while I was out at her house last weekend. Raw food "concoctions" scare me - usually because they involve some version of avocado, my Most Hated Food. If I'm going to eat something raw, I'll take it in it's original form, thanks. But this sauce is different. It doesn't taste like health food, it's just really yummy, and happens to be really good for you too. No one can deny the benefits of raw vegetables, and this sauce makes it easy to eat a lot of them.

The recipe is from How We All Went Raw, a raw foods cookbook that I've had the pleasure of flipping through. If you're interested in adding more raw foods to your diet, I highly recommend checking it out - it's full of recipes for cooking all kinds of "normal" things, using raw ingredients instead of cooked.

Anyway, on to the recipe -

Raw Spaghetti Sauce
2 cloves garlic
2 vine-ripened tomatoes
1/2 c. sun dried tomatoes
2 Tbsp olive oil
1/4 c fresh basil
1/4 c fresh oregano
1 tsp sea salt

Put all the ingredients in a blender, and blend until smooth.

Now, if you're looking for a simmered-all-day, chock full of Italian sausage and pepperoni, hearty sort of sauce, clearly this is not it. Tossed with some homemade pasta, it's great for a light, summer evening meal though, with tons of flavor and not all the heavy ingredients in most spaghetti sauces. It's also really fantastic as a dip for bread, or maybe grilled cheese sandwiches.

Two things in my kitchen come as accepted fact. 1)I am incapable of following a recipe and 2) I will never have all of the ingredients a recipe requires. Based on those two facts, I made a few changes to the recipe. I used a couple of tablespoons of organic tomato paste instead of the sun dried tomatoes, because I didn't have any. I used a couple of teaspoons of dried oregano, because I killed my oregano plant. I thought the two cloves of garlic that I peeled looked kind of puny, so I used four cloves instead. When I make this again, I'll also add a chunk of onion and maybe half a bell pepper and see how it turns out. While I won't promise it'll work, I can't think of any reason this sauce wouldn't freeze well, making it a great 'convenience food'.

Happy cooking.... or, well, blending.


Tuesday, August 24, 2010

Garden to Table Challenge - Week One

Wendy over at Greenish Thumb posted a challenge that sounds like fun, so I'm jumping in since the Kinder Gardens challenge is over. (Totally fell off the bandwagon with that one. Blogging in the summer is so hard!)

Anyway, the goal is to share seasonal recipes that make good use of homegrown or locally grown veggies. If I'm being honest, most of the meals in our house consist of stir-fried garden veggies and a starch, or stir-fried garden veggies and elk steaks. But once in awhile, I do like to have something a little different.

This week's recipe focuses on fresh sweet corn. If you're from around here, you know that Olathe farmers grow the best sweet corn in all the world. It's common to find trucks on the side of the road selling corn 4 for a dollar, or even 10 for a dollar if you're lucky. I don't grow my own corn - we just dont' have the space to justify it. But I do grow onions, leeks, garlic, turnips and basil, so this makes good use of some of our harvest.

Summer Corn Chowder (original recipe from Colorado Farmer's Market Cookbook. I altered it a little to fit us.)

1 stick butter
1 medium onion
2 leeks, thinly sliced
2 cloves garlic, minced
2 small potatoes, chopped
4 small turnips, chopped
6 ears sweet corn, kernels cut off, cobs milked
1 1/2 cups raw goat's milk
1 1/2 cups homemade chicken stock
1/4 cup fresh basil, cut into ribbons
salt and pepper to taste

Melt the butter over medium-low heat. Add the onion and leeks, cook until soft. Add the garlic and cook for another minute. Add the potatoes, turnips, corn and corn "milk", and basil. Cook for 10 minutes, stirring frequently. Add the milk and broth. Bring to a low boil, then reduce heat and simmer about 40 minutes, till potatoes and turnips are fork-tender.

*Disclaimer: I am NOT a great photographer, and especially not with food.
This soup tastes way better than it looks in my pathetic photo.

If anyone else wants to join in, I'm sure she'd love to have you! I look forward to getting some new recipes to try as the garden harvest starts pouring in.